Monday, February 27, 2012

Wedded Bliss

Welcome to the Studio! I'm today's designer on the Card A Day Blog. I've got another wedding card idea for you today. My inspiration for this card was actually two-fold. First the color. I have to admit that it's not your traditional wedding colors, but they are soft and remind me of springtime. Here is the magazine cover that started the whole color scheme...

For some reason, the pinks and aquas just jumped out at me. My second bit of inspiration came from a sketch. I have to admit that I don't remember where I got the sketch. I probably happened upon it during one of my blog-reading marathons. I start out looking at one blog and before you know it, I've clicked on 25 different links and I'm not even on a scrapbooking blog anymore. Here is the sketch I used...
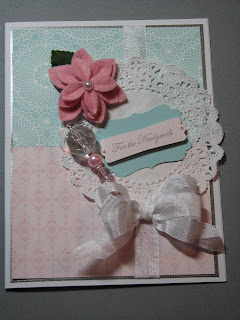
Mix the two together and this is what you get...

To make this card, I used a 5x7 card blank. I cut a piece of DCWV silver cardstock for a mat for my two colors. I just kind of eyeballed it, the same with the Stampin Up patterned paper. I used Sassy Shimmer Spritz (my own mixture) in Marshmallow on the doily to give a bit of shimmery softness. (Tattered Angels Glimmer Mist works great too!) I used white seam binding for my ribbon and bow. I know you're thinking, "how in heck did you tie a triple bow?" With a peg bow maker, of course. I had my dad make a few while he was visiting (and bored) over the Christmas holidays. I got the idea/plans from Becca Feeken's blog, Amazing Paper Grace. She's selling them now if you don't want to make your own. They are a bow-tying life saver and she has many tutorials as well on how to use it and make all sorts of different bows. My felt flower is from May Arts. I picked them up on the way to the Camp Sumatanga Scrapbooking Retreat a few weeks ago. We stopped to shop at the Scrapbook Princess in Moody, AL. If you live in central Alabama, stop by and say hi. She has some great products!
For the sentiment, I used the SU Teeny, Tiny Wishes set (For the Newlyweds) and the SU punches Modern Label and Decorative Label. I added some mini pearls to the sentiment punch. I've been having fun experimenting with stickpins and hatpins. I made this one just for this card. I always like to add a little extra sparkle!
I hope you enjoyed your visit. Until next time, Scrap Sassy!

Wednesday, February 22, 2012

Weddings = Anniversaries

Welcome to the Studio! For my project on the Card A Day Blog, I thought I would make a card that can really be used for almost any occasion that requires a something lovely and elegant. I chose to make this card in grey and pale yellow. I love those two colors together. I used CTMH Grey Wool for my card base as well as my border punched piece at the top, which I inked in CTMH Grey Wool. The yellow paper is from Michael's Recollections line. It has kind of a linen-like texture. The yellow grosgrain is also from Michael's. I used a Hero Arts stamp with Versamark and silver embossing powder. The silver gives it a classy kind of feel. The two gems at the bottom are the Swarovski flatback crystals. I also used a Stampin Up embossing folder, Fifth Avenue Florals, I believe is the name of it.

Now, here's the particulars...
For the cardbase, I cut my paper to 4.25 x 11 and made it so the fold was on the top as opposed to the side. My white mat is sized 4 x 5 and the yellow embossed paper is 3.75 x 4.75. For the grey piece on top of the card, I just border punched it and "eyeballed" it to get the size I wanted. {Remember to stamp and emboss your sentiment BEFORE you glue the strip to the card front. It's always good if you learn from my mistakes;)} Also, I attached the ribbon/blow on the back of the strip before I adhered it to the card front.
I have a picture below of a birthday card I made for a friend using the exact same colors, etc. You can see the embossed pattern better in this photo. This is really a great, all-purpose card.

I hope you enjoyed your visit. Until next time, Scrap Sassy!

Monday, February 13, 2012

Wearing of the Green...and a bonus card!

Welcome to the Studio! Glad you stopped by. I've been sick for the last few weeks, so I'm glad to finally be getting back to normal and feeling like crafting too. If you're visiting from the Card A Day Blog, you know that it's a St. Patty's Day celebration over there. And without further adieu, here's my Irish lass...


This card is really simple. I didn't even measure anything, just eyeballed it. I downloaded the vintage picture from The Graphics Fairy. (BTW, it was FREE!) I used a Martha Stewart border punch on cream colored cardstock for the border and used a small piece of pale green satin ribbon for my shamrock to sit on. I used the Stampin Up label punches for my sentiment. The Happy St. Patrick's Day stamp is from JustRite Stamps.


Now for that shamrock...
I wanted something different. I had tons of shamrocks from foam and felt to brads and bling, but none really looked quite right. So what's an obsessed scrapper to do? Make your own!


For this technique, I mixed a few tablespoons of UTEE (Ultra Thick Embosing Enamel) with CTMH Garden Green re-inker. I did this in a plastic bowl and using a popcicle stick to stir. The re-inker tends to bead up and you just have to mush up the little balls of color, kinda like getting the lumps out of a bowl of brownie mix.


After it was mixed up good, I added some green shimmer Pearl Ex to it. I used the end of the popcicle stick to scoop a little out of the container. After mixing that in, I dumped the mixture into a melting pot. There are several brands and they are quite inexpensive if you use a coupon at one of the chain craft stores. {It's also handy for melting hot glue for dipping.}


I turned the melting pot on to the UTEE setting and let the mixture melt, stirring occasionally to make sure the color was uniform. After it was melted, I poured the mixture into a candy mold...yep, you read that correctly. I had an old chocolate candy mold of a shamrock stuck up in the top of a closet. If it can handle the heat of candy, it can handle UTEE. After the UTEE mixture was poured into the mold, I just let it sit undisturbed until it cooled. It popped right out of the mold. How easy is that! And there are tons of really awesome candy molds these days with lots of pretty flowers and flourishes. The possibilities are endless!


I had so much fun messing with the UTEE, I plan on digging out a few more of my old candy molds to play with. I have several set of monogram alaphas that would look really cool. There's also a few other UTEE techniques I'm getting my nerve up to play with!


And here's a bonus...


I couldn't let Valentine's Day pass without putting up a Valentine's card, so here is a simple, French-inspired bit of Ooh La La!


I hope you enjoyed your visit. Until next time, Scrap Sassy!