Saturday, July 30, 2011

This Is Only A Test

Welcome to the Studio!

In anticipation of our CKC-Nashville trip, I wanted to make sure I could update my blog, including pictures, from my iPad. I'm planning on keeping everyone in the loop, so even if you couldn't make it this year, you'll feel like you're there!

Here is a quick, little fall decoration I made last year. It's your average dollar store candle, just dressed up. Using my Silhouette, I cut "Give Thanks" in brown vinyl and added it to the candle. If it doesn't go on straight, don't fret. The wax is quite forgiving. You can scoot it around and get it in place. I glued some silk leaves and a sunflower together with glue dots and using a short stickpin, attached it to the candle. I love fall and I'm looking forward to the cool weather. I am quite tired of this summer heat.

My next post will be on Thursday when we hit the road...CKC or Bust!!!

Friday, July 22, 2011

A Visit From My BFF

Hello again and welcome to the Studio!

I want to send a quick shout-out the newest member of scrapbook royalty, Julia. She is my friend's daughter {and my BFF} and she scrapped for the very first time this week. She made a mini album of her visit. Here are some pictures of "The Scrap Queen" and her project...


All I did was cut things out and print pictures. Ms. J did the rest. She loves using daubers to distress the edges of her pages and is quite talented with them!


I snapped of picture of the train coming into the station in Birmingham. The paper she chose was Scenic Route. The bluejean pocket, with rhinestones of course, was all Julia. She had fun playing with the iRock. This is the first page she "daubered."


This is a sweet picture of Julia and her grandmother, Lena, who happens to be my Mom's BFF. Julia enjoyed adding Stickles to the scallop trim and picked out a Sassy original flower in muslin & denim to match her bluejean pocket.


Our first stop was at the McWane Science Center. We had fun making handprints in the neat peg-board thingy. We had a LOT of fun playing with it. And our hands are almost the same size!


It's hard to see from the photo, but the little red hands are on pop dots and embossed with Swiss Dots to mimic the dottie-ness of the pegs.
Julia had a blast digging in the dino excavation pit. We both enjoyed the Sea Monster exhibit with the huge, icky prehistoric fish.

Our favorite was World of Water and seeing all the pretty fish. We also got to pet baby bonnethead sharks, but don't look for any photos of that event. This big dummy was having so much fun petting them that I forgot to take a picture. I can't help it...I just love to pet things.

Julia chose the titles for these pages...Finding Nemo And Jelly-fishing.
The title here is: A Sea-riffic View. She's so witty! And did I mention she's only nine?


Julia really enjoyed making "Waves of Stickles" for the borders on these pages. On the first page, she is riding a huge, fiberglass big mouth bass. Here caption reads, "Who's fish food now..."

Here, Julia is pretending to be eaten by the same big mouth bass. Her caption, "Apparently, Me!" This is probably my most favorite captions of the whole album. I laughed 'til I cried when she came up with this one.

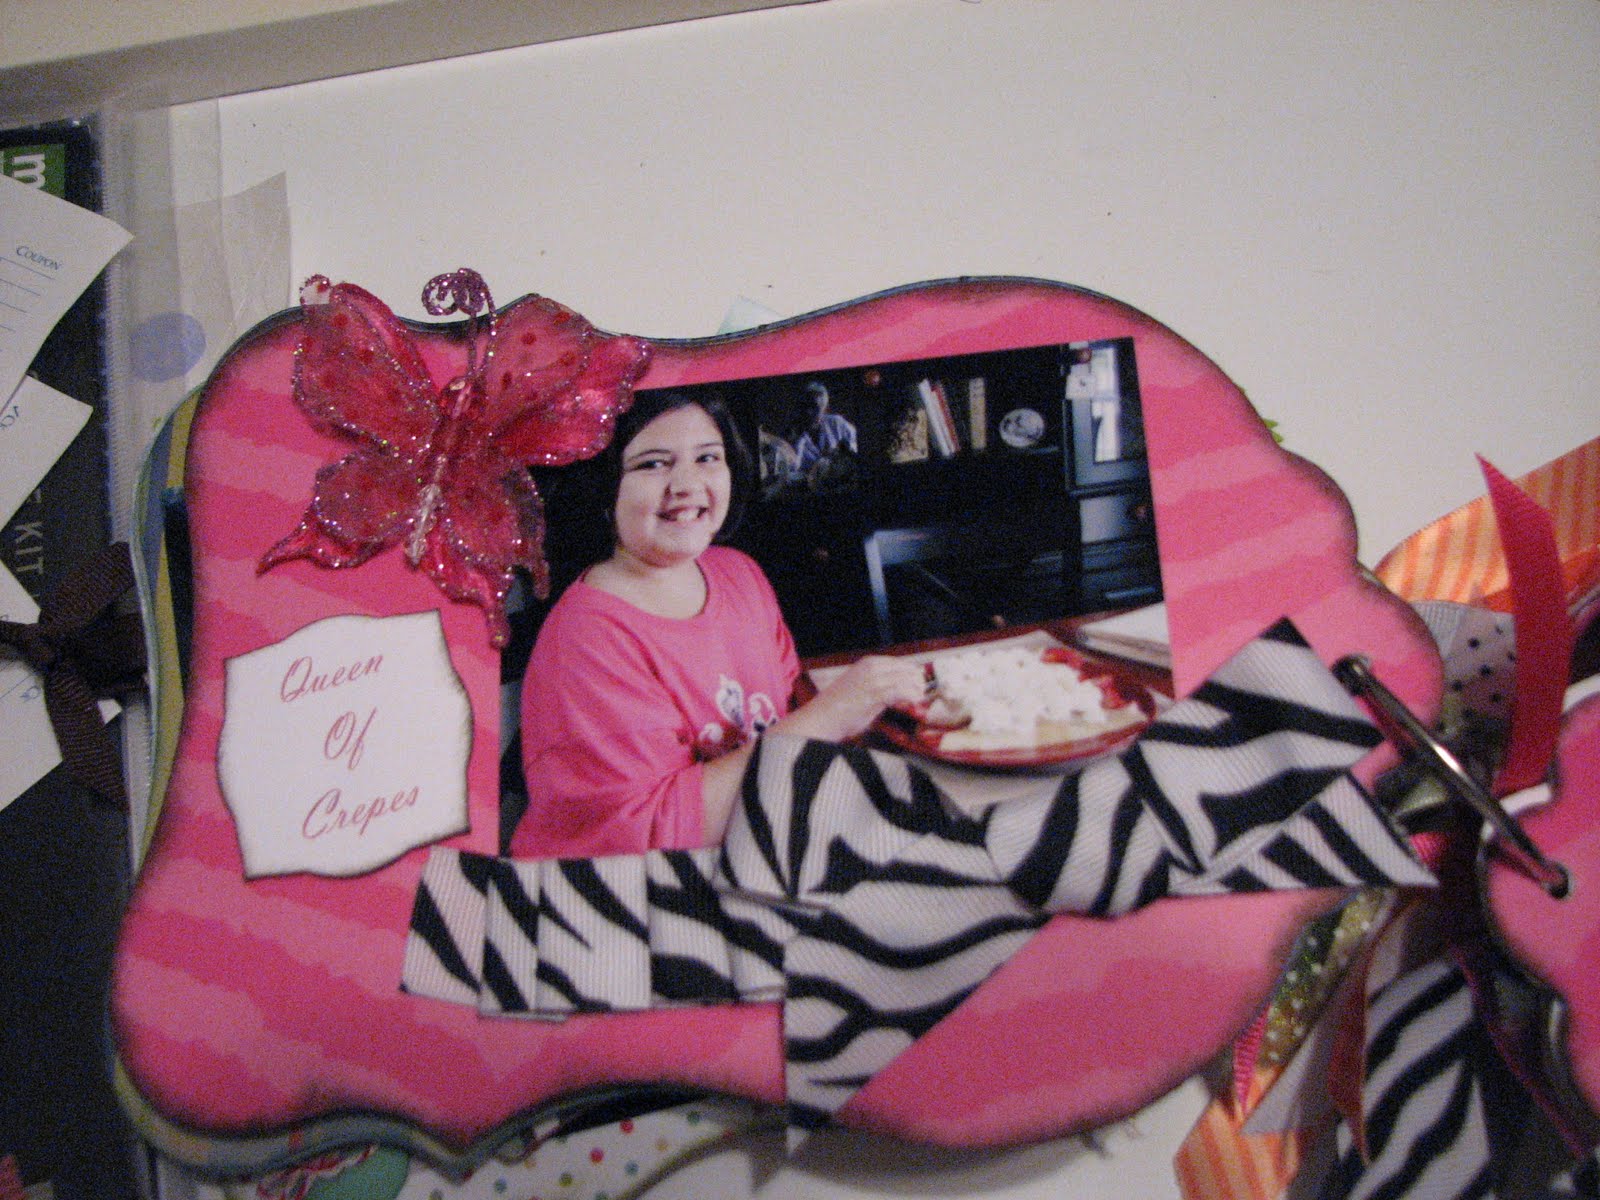
It's been a ritual for as long as I can remember that when Lena comes to visit, I always fix strawberry crepes for breakfast one morning. It seems to be a "new tradition" for Ms. Julia too. She really enjoyed pigging out on the whipped cream covered crepes. There's even a note in my cookbook that when Julia visits, make a triple batch of crepes:)


These are probably my two most favorite pages in the album because they just girly-girl and precious. It captures her personality perfectly. Glimmer Mist was used in the making of this album...and LOTS of it. Unfortunately for Jayne, Julia's Mom, most of it is on Julia! When we ate breakfast this morning, Julia still had glittery, glimmery sparkle everywhere, even after two baths.


She adores animals and wants to be a vet when she grows up. Our three dogs are so going to miss her. They haven't been petted and played with that much ever! This page is probably Julia's favorite because of the caption..."If the collar fits, wear it." We were able to find the cutest little collar embie in my stash to coordinate.

She needed room for journaling. Julia loves to read, so she chose to use a book diecut for her journaling.


And what's a Scrap Queen without a crown?

I had a fantastic time with my new scrapping buddy. I can't wait for Julia to visit us again. She did an awesome job on her album (and the three cards she made too). Thanks, Jayne, for sharing your little princess with me. I'm returning her a Scrap Queen!


Until next time, find inspiration everywhere and Scrap Sassy!

Saturday, July 16, 2011

Got the "Stay-cation Blues"?

Welcome to the Studio!


It's summer and time for travel and fun...well, not for me. At least not yet. My wonderful hubby is working his fingers to the bone and doing enough {business} traveling for the both of us. Although Mom & I have a scrappy getaway planned for August, CKC Nashville, it's not the same as spending a week relaxing with your significant other. And since he's starting grad school this fall (i.e. three weeks from now), it may be a while before we have time for a real vacation. So for now, I guess you could say I have the "stay-cation blues." The best way to battle those blues? Scrap your last vacation. Or in my case, get a fire lit under my rear and scrap the last six years of vacations. So here's what I've been up to...


We went on a cruise in December 2010. I was off from work anyway for two wrist surgeries, so it seemed like one of those kill-two-birds-with-one-stone kinda thing. We had been talking about going on a cruise for ages and we're glad we did. I didn't have complete use of one hand yet, so not having to cook, clean, or carry anything for a week was bliss. The heaviest thing I lifted was a fork;) Our steward, Joe, did everything for us, including making these cool towel creations. And yes, that was a "towel bat" hanging from the air conditioner. I thought that one was particularly groovy...probably because I'm a fan of all things vampire.


I used some really old Scenic Route paper that is pink and a golden orange. I have no idea why I love this paper collection so much. I found some on a clearance rack a year ago and bought more! Not sure if you can see it in the photo, but I used a Bazzill stitching template and did a decorative stitch on the top and bottom of my main photo area with ivory embroidery floss. It was time-consuming, but I love the look and the texture. It makes me think of a soft baby blanket, or maybe soft, fresh-from-the-dryer bath towels.


Cruises are a scrapbooker's heaven. There were at least five different photo opportunities before dinner the first night, not including them taking our picture when we boarded. I would have stood in every line, but my darling Keith didn't want to spend more on photos than we did for the cabin:) I limited myself to one per evening, not including the photos they took at dinner and each of the ports. We would walk the whole ship so I could scope out the best "photo op" each night before dinner.


I think the paper might be Creative Imaginations. I was buying cruise paper and embellishments for months before we actually went on the cruise.


Muster Drill...you have to do it, so why not make it fun. Here's me and Keith being silly with our life jackets on. Sexy, huh? There's nothing more glamorous than reflective safety orange;)

This is probably the only time other than our wedding day that we took "formal, dressed-up" photos. One reason might be because I hate wearing pantyhose. I think Keith looks really handsome in this picture. I'm not so pleased with my really red cheeks...too much sun, I guess. For this layout, I used ivory and black Bazzill Bling cardstock, vellum printed with a silver scroll design. {I actually bought it for a wedding layout and didn't use it.} To bring in the dark red color, I used Tacky Tape (aka bologna tape) to add a very thin "wave" of glitter up the side. I also Glimmer Misted the two flowers in the corner. The black woven border is actually home dec trim from the sewing department.


I always tell my scrappy friends, and especially new scrapbookers, that there's no such thing as a mistake in scrapbooking...it's just an opportunity for embellishment. I used EK Success decorative corner punches on the four corners of my photo mat. That really pretty flower in the corner...yep, you guessed it...an opportunity for embellishment! That was my last piece of black Bazzill Bling and instead of punching the corner, I chewed it off. What's a girl to do? Add flowers and bling; right?


I'll be back soon with some more card and layout ideas; and I'm still on my flower making kick, so I'll have pics of some of my new blooming creations too.


I hope you enjoyed your visit. Until next time, stay inspired and Scrap Sassy!

Sunday, July 10, 2011

Technique Blog Hop - Banners!

Welcome to the Studio!

I'm participating in the Monthly Technique Blog Hop. This month we're highlighting banners. We all love the party atmosphere they convey and they are so stinkin' cute too. This month, we are featuring the banner technique on Page 35 of the current Close To My Heart Idea Book, but with a twist. Our goal was to find something other than triangles to create banners with.

Our blog hop is a great big circle, so you can start wherever you want and continue through to see all the fabulous artwork incorporating this technique. If you would like to start from the beginning, please visit Debi's Blog. While there, you will also find a listing of all participants and their blog addresses if you should get lost or want to reference a blog along the way. The list is also at the end of this post. Let’s get started!

If you are coming from Sheila's Blog, you are on the right track! This technique is highlighted with the Fanfare paper packet in the Idea Book, but you will find variations for its use throughout this hop.

For my project, I was thinking more out of the box than usual. I've been really interested in learning to make flowers for a few months now and I'm still on the flower kick, because they ended up on several cards I've made lately, including this one. That being said, why does a pennant have to be, well, a pennant? Can't a trellis and flowers be the banner? Check out my flowery vine version of this theme.


For the flowers, first of all, they were all made with just plain circles. Nothing fancy about that. The two on top were made by folding the circles in half and overlapping them. The centers are just stamped circles with a dimensional dot. The two larger flowers were made by folding each of the circles in thirds. I inked the edges for a bit more dimension. I apologize for using the Mayberry WOTG kit twice in a row for my blog hop projects, but I just can't help myself. It's my favorite!


If you would like to see details on the technique or my supply list, please continue reading below. If not, please continue onto Neely's Blog, where you will find some additional artwork highlighting this technique! Be sure to leave a comment and let me know what you thought of my variation and happy hopping!

Supply List:
Mayberry Workshop Kit G1022
Inks: Cocoa Z2114, Honey Z2162, Smoothie Z2196, Olive Z2137, & Crystal Blue Z2117
Cardstock: (not included in kit) Honey, Garden Green, & Crystal Blue
Stamps: (not included in kit) D1406, January Stamp of The Month, 2010
Circle Punch, Z1311
Sponge daubers, Z726
Blending Pen, 3174
Misc. items: circle punches, Make The Cut, Cricut Expression

Thanks for stopping by! Continue onto Neely's Blog to continue the hop!

Here is the list of Hoppers:
1. Debi Barber – http://debiistheothersister.blogspot.com
2. Teri Baxter – http://themidnightartist.blogspot.com
3. Judy Faye Garner - http://www.judyfaye.blogspot.com
4. Sheila Wilkerson – http://ezscrapbooks.blogspot.com/
5. Kelly George-www.sassyscrapperstudio.blogspot.com.
6. Neely Dean – http://neelydean.blogspot.com